Using the toolbar: click on the
Advanced
Tutorial:
A short study of lights
written by
Olivier SARAJA
e-mail: olivier@linuxgraphic.org
There are many light systems available with kpovmodeler, and using one instead of another can give two same scenes different moods and feelings. Point lights prove to be better for general illumination, while the spot lights dramatically focus the attention of the scene on a specific item. But how to use and deal with all these kinds of lights and many parameters? This is what we will try to explain in this short study of each light systems currently available along with the cool combination that is POVray 3.0 and Kpovmodeler 0.2.
First step toward illumination
As you should already know, there are two convenient ways in order to set a light system:
Using the menu: Insert > Light
Using the toolbar: click on theicon
Once this basic operation is done, the Object tree should show a new entry called 'Light'. By selecting it, the Object Properties View should update and show the available parameters for a standard light system:
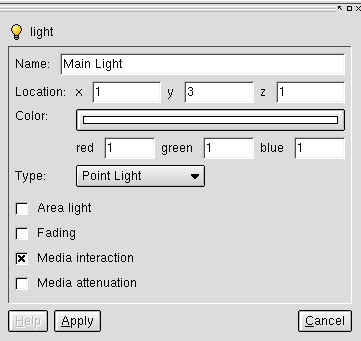
The light systems to play with
A few parameters are common to all of the light systems, and will be explained now.
Because the scenes can be heavily enhanced by complex and subtle lightings, it would always be a good idea to give each light a different name. The Name field is a convenient way to sum up the properties of the light system, and this is generally the case with each objects in any kpovmodeler's scene.
Location should be self-explanatory but is very important: the y componant could produce very classical shadows if set high in the sky, or could produce long and stretched shadows (a very dramatic effect easy to achieve) if set low on the horizon, as during dusk or dawn. The x and z componants are equally important because they will state if the objects of the scene are darkened by their own shadows if the light radiates from the background, or are largely illuminated if the light originates from the foreground. In fact, it is always a good idea to make multiple rendering tests with varying location parameters, as interesting and surprising results can arise by experimentation.
The Color of the light is also an important parameter of the light system. While playing with Ambiant Light in the general settings could be more straightforward, subtle colors induced by soft lights could produce very dramatic results. The following picture illustrates perfectly what has been said here. The light source is low on the horizon, which produces very stretched shadows. The whole scene is slightly tainted in orange. The combination of both gives a dusky atmosphere.

Of course, the choice of color is key to the suggestion of an environment, and it could be subdivided into two categories: cold and warm colors. For example, a cold blue color could be choosen to enhance a polar landscape or an ice desert, while a green color will be perfect for a scene located in a swamp, a deep forest or even underwater. With the same goals in mind, warm colors like yellow could be helpful for sunny afternoons, like a paradisiac beach or a desert scene; an orange lighting could suggest either a bonfire or a sunset. Neutral colors can also help with specific scenes: in fact, when you don't know what should be the feeling or the mood of the scene you're working on, always start with the standard white light. Moreover, white light is particularly suited to scenes only lit by the moon and/or the stars; on the other side, light greys will help depicting dull, dusty and mourn worlds if used properly. Choice of color is capital, as it can truly induce feelings: what about a subtle redish light for the background of a battle scene, or a light pink color for a romantic scene? Choice is yours, but always remember to experiment and to try something new each time, as interesting situations could arise.
But now, let's pay attention to the specifics of each light sub-systems.
Case 1: The point
light
The point light is
the default light, and also the simplest light available. It produce
light radiating from a single point source, suitable to light sources
such as candles, torches, bulb lights and so on. Usually, it gives
the best result in closed indoors environment, and is quite
inapropriate in outdoors environment where it seems very unrealistic,
unless coupled to the Area Light
option (see below). In most cases, if you set many lights in your
scene, you will experiment a light over-exposure.

There are two means to solve this. The first one is useful to lights with neutral colors: if you set all the three color components to the same value, the value then specifies the light intensity: low values like 0.15 or 0.30 will give darker lights than higher values like 0.80 or 1.0. Of course, you can also set the three components to a value greater than 1.0 to obtain over-exposed pictures with a single light sytem.... The second mean is to use the Fading properties, which need more explanations.
In fact, the Fading
property lets you deal with the intensity of the light system: Fade
distance and Fade power
are discussed below.
Fade distance: it indicates at
which distance from the emitting source the system start to loose
intensity. Hereafter are example renders for increasing Fade
distances. It's very easy to see the influence of the fade
distance on the lighting of the whole scene. The greater
the value, the more the scene is lit. Of course, if Fade
distance is kept unchecked, the light intensity is
constant throughout the whole scene, lighting it up to infinity if
the lamp is set high enough in the « sky ».


In this example
file, you should note that the Fade distance
is calculated from the emitting light system, not the center of the
scene. Even if it seems obvious, it explains why, with a Fade
distance equal to 1, even the red sphere is in pitch dark
shadows on the first picture. When activating the Fade
distance option, you certainly will have to experiment
with the settings until you achieve the proper illumination
intensity. This option is particularly important in scenes involving
more than one light source, because the energy of each will add to
each other, resulting in an over-exposed rendering, as already
discussed before.
Fade power: this parameter
illustrates how "quickly" the light becomes dull once the
Fade distance is achieved. Please
note that Fade power must be
greater than or equal to 1. For high Fade
power values, you can get results close to the spot light
effect, as shown on the following pictures made with a Fade
distance set to 10. The higher the fade
power is set, the sharper is the frontier between light
and darkness.


Case 2: The Spot
Light
The Spot light
differs from the Point light
because it beams its light cone-like, instead of radiating it. It
isn't a source light generally available in nature, but rather an
artificial (or incidental) one. It can help in achieving dramatic
effects, which is why it is commonly used during the making of a
movie. Used along with Media interaction
(as will be seen later), it will help produce cool lighting effects,
known as volumetric light.
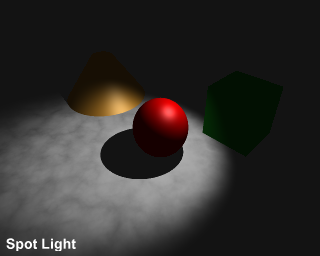
There are some new
parameters that come with the Spot light:
Radius, Falloff
and Tightness. Here are short
explanations of these.

Radius: the
Radius angle specifies the area
under full light conditions.
Falloff: the Falloff
angle defines the area beyond which full dark conditions are met.
Of
course, the area between the Radius
and Falloff values is under
decreasing lighting conditions, from the Radius
angle (where light is maximum) up to the Falloff
angle (where light is null). Both values must be ranged from 0 to 90
degrees.


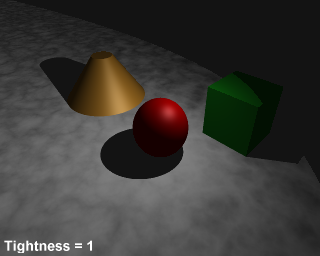
Tightness:
this value is a way to specify the fuzziness of the lighted area's
frontier, when Falloff is lesser
than or equal to Radius. A low
value indicates a very sharp border, while a high value indicates a
very fuzzy border.The value is ranged from 0 to 90.
The
pictures below show the influence of this parameter on the scene,
with Radius=70 and Falloff=70.



Case 3: The
Cylindrical Light and the Shadowless Light
The Cylindrical
Light behaves very much like the Spot
Light and all parameters also behave exactly the same. The
Cylindrical Light main
application is the laser beam, if you are interested in ;o) but in
most cases you shouldn't have to specify such a light type.


As its name suggests,
the Shadowless Light produces no
shadow projection from an object to another: each object is rendered
as if it was the only object of the scene. It cast no shadow and
receives no shadow except its own.
Case 4: The Area
Light
From now on, all lights originated from a single point,
so the shadows' borders were very sharp. But direct observation of
our surrounding generally uncovers predominance of very soft shadows,
with fuzzy borders. This is mostly the case outdoor, but also when
the sun is shining through a window, or when the light is radiating
from your computer screen.

In
fact, these soft shadows are cast because of light originating from
areas rather than points. The sky, a window, a TV screen could
reasonably more or less be considered as wide areas. A candle, a bulb
or a lamp shouldn't. This also hints to what kind of light you should
use for better accuracy or believability.
If you check Area
Lights in the Light dialog window, you can expect softer
shadows (and longer rendering times!), but you also discover many new
parameters to play with. You should also note that these are faked
area lights, and that general luminosity of the scene is kept
constant, weither this option is checked or not.
In fact, area
lights are faked using the following trick: a grid is
defined, and at each point of the grid is set a sub-light the same
type as defined before Area light
option was turned on. Because of this trick and the tightness of the
grid, area lights generally work better from a minimal distance (to
be sure of this, try the example scene with Location x = 1, y = 3 and
z = 1, and then with x = 10, y = 30 and z = 10 to see softer shadows
cast by the same objects or Light system).

Axis 1, Axis 2:
as for all planes, two vectors are enough to define the grid. Here
you can specify the coordinates of each vector, but you can also
rotate the grid in any graphic view. Most of time, the plane should
be set vertically when simulating light originating from a TV screen
or a window, or horizontally when simulating the skylight. Values
greater than 1.0 implies a wider emitting area.
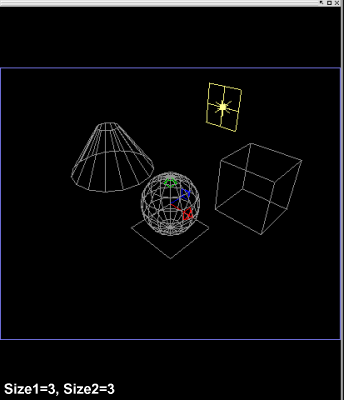
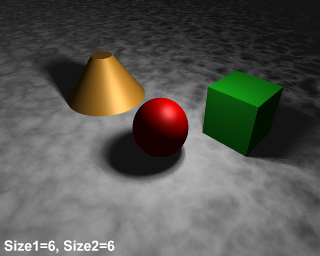
Size 1,
Size 2: there you define the number of subdivision of the grid in
the two local directions of the grid defined previously by the two
Axis. Of course, the higher you
set these values, the more sub-lights will be used in the rendering
calculations, with two immediate consequences: softer shadows, longer
rendering times. It's your choice to decide between realism and
rendering times, but don't let technical considerations impair your
artistic creativity: in most cases, it could be a good idea to work
with a single Point light, for
example, and to activate the Area Light
option (with higher values of Size)
at the very final rendering of your scene.


Adaptive:
this is work around to enable quicker calculations, but it results in
approximated shadows. The lowest the value, the quicker the
calculation but the less accurate the shadow cast. The higher the
value, the longer the calculation but the more accurate the shadow
cast. Starting with a value of 1 is always a good base, you can
increase the value until the effect is visually good. If time isn't a
matter or if you have a computer with a « strong »
CPU, then you can set immediately this value to 5 or more if you
want.
Jitter: light sources are set according the grid
subdvisions, but these are too regular to seem natural in most cases.
Activating Jitter adds some
randomness at the exact location of each sub-light of the area light.
Because of the randomness, you will never get the exactly the same
shadow casting from a render to another.
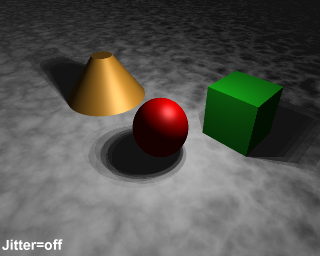

Of course, due to
the scattering of the shadows while Jitter
is on, this option works betters with higher values of Size1 and
Size2, as shown on the following example:

Working
with Medias
There are still two checkbox options we haven't dealed with yet... While Medias are a stand-alone topic in themselves, needing a full incoming tutorial to explain and explore, here's what we could say in short: Medias are some sort of particles system (handy for simulating smoke, fire, dust and fog, for example) that can interfere with the lights of your scene, helping achieving volumetric light effects, such as making visible a ray of light. You are still puzzled? Okay, along with the kpovmodeler standard package comes some demo files. In /usr/share/apps/kpovmodeler/examples/scenes/interior you should find a file named media2.kpm which a very good starting point in order to learn what are and how do Medias work. The first picture below depicts this example scene mainly lit by a standard Spot Light. The second is exactly the same scene with a Media defined in order to simulate a fog of dust inside the room. Of course, the Medias parameters will define the density of the dust and many more aspects of it, but it's beyond the immediate scope of this study.


Media interaction: this checkbox states weither the light system should consider any Medias defined within the area lit. Set it 'on' if you want to achieve volumetric light effects, for instance, as on the second picture showed just before.
Media attenuation: with this option turned on, the light looses part of its intensity during its travel through the volume occupied by the Media. The third picture perfectly depicts that: Media attenuation is off and the room appears brighter than in the previous case, as light hasn't been impaired by the particles floating in the air. Of course, setting 'on' or 'off' Media attenuation is a matter of artistic choice as well as realism. If only simulating dust floating in the air, I'd suggest to simply set it 'off'. In the case of more meaningful particles, such as smoke or snow, setting it 'on' should be appropriate most of the time as these 'particles' could impair visibility.
Conclusions
You
should now feel at ease with lights. In this short study, we tried to
give you some basic knowledge of the mechanics by explaining the
various parameters, but also to hint you which lighting type is more
suited to a given scene. Lighting of the scene is the key of the
artistic approach. Light conveys mood, temperature, atmosphere. You
should always pay attention to the lighting of your scene, because it
could well give it a soul on itself.