Basic tutorial #3:
Modelling a screwdriver using CSG
written by Olivier SARAJA
e-mail: olivier@linuxgraphic.org
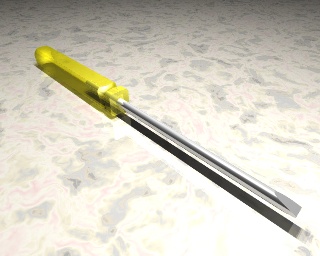
In this tutorial, we will see how to model a screwdriver using CSG (Constructive Solid Geometry). The process is quite straightforward, and uses Boolean logics. This mean rigor and basic knowledge in order to get the proper result. Fortunately, the Object Tree will help us getting the right result. But here we go for a little explanation on Boolean operations first.

A few words on the Boolean operations
Kpovmodeler make use of four kind of Boolean operations during the modeling stage. Union, Intersection, Difference and Merge. Let's study how these operands work when two (or more!) overlaping volumes are involved:

Union and Merge:
These two cases seem to behave the same way: the two objects look as glued altogether (as on the previous picture that involves no Boolean). But in fact, there are slight differences between the two results, that can be easily seen if you give the same texture -with some transparency- to the two objects (let's say a Pigment Solid Color with a Filter value set to around 0.4).
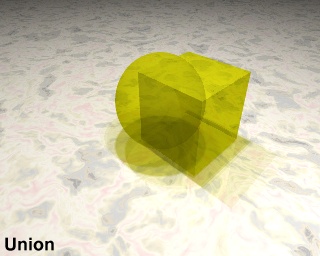
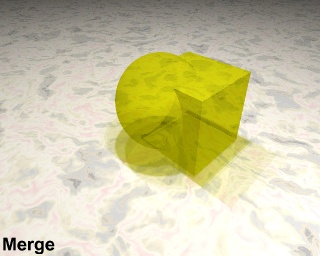
In fact, Union merely glues two objects altogether and keeps the frontiers of each, while Merge considers only the frontier of the overall object. This is why the overlap volume of the two objects is showed on the Union picture, and not on the Merge picture. As a first thought, the difference between Union and Merge becomes relevant only when you deal with transparent materials.
A common question could be « Why should I bother using Union or Merge when I could get the same look on my rendering without using any CSG? » Let's face it, you're certainly right: upon rendering (unless you make use of semi-transparent materials) you won't see a difference. It's more in the way you deal with objects after a Merge or Union operation that you'd find a difference. When multiple objects are involved, you can rotate, translate, resize, assign a material and much more to all the involved objects at once if you used Boolean first. If you didn't, then you'll have to apply all the transformations on a one-for-one basis for EACH object involved! But hey, it's your time and your business!
Intersection:
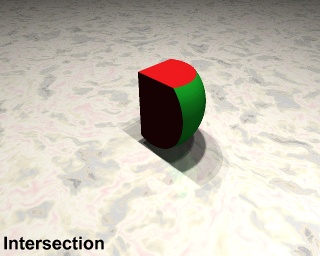
The result of an Intersection operation is quite easy to understand: The resulting volume is equal to the overlaping volume of the two objects.
Difference:
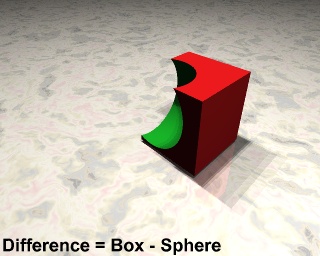
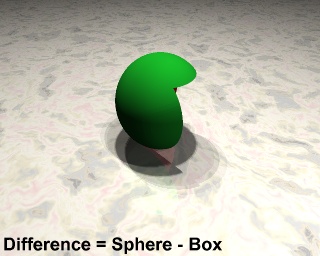
The order in which the objects are described in the Object Tree (reading from top to bottom) particularly matters in this case: Box then Sphere reads as a boolean « substract Sphere volume from the Box volume » operation. Of course, Sphere then Box reads as a boolean « substract Box volume from the Sphere volume » operation.
Step 1: Loading the default scene
First of all, open kpovmodeler and load the basic scene. I configured this scene with some basics that will let us concentrate on the modelling of the screwdriver: a basic plane for the ground, two light sources (one coming from the virtual ceiling and another coming from a virtual window) and a camera. I also configured the global settings, even if I kept all the default values: it can later become interesting to play with these values for a greater impact upon rendering, but it is beyond the scope of this tutorial.
This is the basic scene I always use when I model objects: all the attention is focused on the object, not on the scene. It's perfect for a library of ready-to-use objects, such as these I modeled recently:


Please click on this link to save the
default.kpm file in a proper place of
your hard disk. Once done, you can upload it into kpovmodeler (File
> Open or
![]() Icon) then browse to the file location and click on the OK
button.
Icon) then browse to the file location and click on the OK
button.
You are suggested to immediately save this file with another file name (File > Save As...):
type the new filename (screwdriver.kpm, for example) in the 'Location' field and press the Save button to generate the file.
Step 2: Setting a few good primitives (long)
Let's go! First of all, select the
'Scene' entry in the Object tree. All subsequent objects created will
be added as children objects. Add a cylinder to the scene (Insert
> Finite Solid Primitives > Cylinder
or
![]() Icon). You will be prompted to choose weither the object
should be inserted as a First Child or Last Child object in the
Object tree. Please choose Last Child. This way, all the lines
regarding the object you're currently modeling will be located at the
bottom of the Object tree.
Icon). You will be prompted to choose weither the object
should be inserted as a First Child or Last Child object in the
Object tree. Please choose Last Child. This way, all the lines
regarding the object you're currently modeling will be located at the
bottom of the Object tree.

Click on the '+' symbol standing just before the name of the new line to develop all the already available properties.

Each newly inserted object comes with these three properties: scale, rotate, translate. When they are not immediately available you can add them to the object by clicking on the object's line in the Object tree and then:
Using the menu: Insert > Transformations > Scale, Rotate and/or Translate
Using
the toolbar: click on the
![]() ,
,
![]() or
or
![]() Icons
Icons
For
the Finite Solid Primitives, it souldn't be necessary, so you can
directly click on the existing rotate
![]() entry in the Object Properties View and adjust parameters as follow
(don't forget to press the Apply button or to hit Enter):
entry in the Object Properties View and adjust parameters as follow
(don't forget to press the Apply button or to hit Enter):
![]() rotate
rotate
x = 0, y = 0, z = 90
The
same way, click on the resize
![]() entry and adjust the parameters as follow:
entry and adjust the parameters as follow:
![]() scale
scale
x = 1, y = 8, z = 1
Eventually, click on the Cylinder entry and set the parameters as follow and uncheck the Hollow box:
![]() cylinder
cylinder
End 1: x = 0, y = 0.5, z = 0
End 2: x = 0, y = -0.5, z = 0
Let's create a sphere for one of the
ends of the cylinder (Insert >
Finite Solid Primitives > Sphere
or
![]() Icon).
Icon).
Please note that the Sphere has automatically inserted as Last Child object in the Object Tree, because the selected entry was the Cylinder and that it can't afford a Finite Solid Primitive entry as a Child. Now click on the Sphere entry and set the parameters as follow and uncheck the Hollow box:
![]() sphere
sphere
Center: x = -4, y = 0, z = 0
Radius: 0.15
Of course, the sphere will later be merged with the cylinder. With the same logic, we will add two Box objects that will be substracted to the merged group object in order to make the blade of the screwdriver.
First add a new Box object to the scene
(Insert > Finite Solid Primitives
> Box or
![]() Icon).
Icon).
Click on the '+' symbol standing just before the name of the new line to develop all the properties of the Box object. The same way we already did with the Cylinder and Sphere objects, adjust the following parameters as follow and uncheck the Hollow box:
![]() box
box
Corner 1: x = -0.5, y = -0.25, z = -0.25
Corner 2: x = 0.5, y = 0.25, z = 0.25
![]() rotate
rotate
x = 0, y = 0, z = -13
![]() translate
translate
x = 3.7, y = 0.35, z = 0
And now, for the tricky part: we will duplicate the Upper Box and turn the copy into a Lower Box. Fortunately, the Object tree will help us keeping this operation simple. Here is what we currently have in the Object tree, and what we would like to see, the Lower Box being the symetrical along the x axis of the Upper Box:

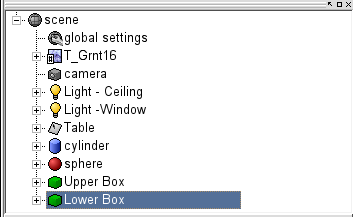
Here's
how we can get this result. First of all, select the Upper Box entry
in the Object tree. Make a copy of this entry (Edit
> Copy or CTRL+C or
![]() Icon) and then paste it (Edit
> Paste or CTRL+V or
Icon) and then paste it (Edit
> Paste or CTRL+V or
![]() Icon). With the new entry selected, immediately change its
name in the Object Properties View, and then change its rotate and
translate values according to the following values:
Icon). With the new entry selected, immediately change its
name in the Object Properties View, and then change its rotate and
translate values according to the following values:
![]() rotate
rotate
x = 0, y = 0, z = 13
![]() translate
translate
x = 3.7, y = -0.35, z = 0
Step 3: Using CSG for the Blade
The nasty job is already done, and here comes the meaningful and simplest one: using the Object tree, we will sort the different primitives we just inserted and call upon Boolean operations in order to get the proper shape for the blade of the screwdriver.
With the Scene entry selected, please
insert a Union, a Merge and a Difference object (Insert
> Constructive Solid Geometry > Union, Difference and Merge
or
![]() ,
,
![]() and
and
![]() Icons).
Icons).
Each time, you'll have to declare the new object a Last Child upon popup request. Here's what you should get in the Object tree:

Using Drag&Drop, CTRL+X (Cut) and CTRL+V (Paste) or the Cut and Paste icons, sort the entries of the Object tree in order to get the following result (choose First Child or Last Child as appropriate):

The Union entry will be useful later, when we will start to model the shaft of the screwdriver. In the Object Properties View, the Difference entry could be renamed something like Screwdriver Blade, for an improved visibility in the Object tree.
Step 4: Setting a material for the Blade
Of course, rendering the scene now will show us nothing but a pitch black blade for the screwdriver: we need to define a proper material. There are many way to set a material, but I'd like to introduce a method that make the material easily reusable in another scene. Of course, you could reuse one of the Chrome textures shipped with the kpovmodeler example files but I thought it would be more interesting to set all the following by ourselves.
Select the Scene entry in the Object
tree, then insert a Declaration as a Last Child (Insert
> Declaration or
![]() Icon).
Icon).
In the Object Properties View, you can
rename it to Chrome. Then Insert a Texture (Insert
> Textures > Texture or
![]() Icon), a Pigment (Insert >
Textures > Pigment or
Icon), a Pigment (Insert >
Textures > Pigment or
![]() Icon) and a Solid Color (Insert >
Textures > Solid Color or
Icon) and a Solid Color (Insert >
Textures > Solid Color or
![]() Icon). Click on the Solid Color entry and modify the parameters as
follow:
Icon). Click on the Solid Color entry and modify the parameters as
follow:
![]() solid color
solid color
red = 0.93333, y = 0.93333 , z = 0.93333
filter = 0, transmit = 0
Now select the Texture entry, Insert a
Finish (Insert > Textures >
Finish or
![]() Icon) and adjust the parameters as follow:
Icon) and adjust the parameters as follow:

The texture has been correctly set, but you still have to assign it to the Screwdriver Blade. In order to do this, first move the Texture Declaration just after the T_Grnt16 already showing in the Object tree. By doing this, you make sure that all the objects declared 'later' in the tree can use this texture as part of its own texture declaration.

Select the Screwdriver Blade, and
insert a texture (Insert >
Textures > Texture or
![]() Icon) as Last Child. Click on the Select button and then choose
'Chrome' in the popup list.
Icon) as Last Child. Click on the Select button and then choose
'Chrome' in the popup list.

And here's the final result:

Quite easy, huh? In fact, you'll see that modeling the shaft of the screwdriver is equally easy and straightforward.
Step 5: Modeling the shaft
You should be used to CSG for modeling, now, so we'll try to get to the result more quickly and with less speech than previously: you already have all the basics at hand, it's up to you to improve your skill with them!
First of all, with the Scene entry
selected, let's add a Cylinder (Insert
> Finite Solid Primitives > Cylinder
or
![]() Icon) as Last Child. Keep all the Object properties for the
Cylinder by default, but adjust the following parameters:
Icon) as Last Child. Keep all the Object properties for the
Cylinder by default, but adjust the following parameters:
![]() rotate
rotate
x = 0, y = 0, z = 90
![]() translate
translate
x = -5, y = 0, z = 0
The Hollow box should be unchecked.
With the Cylinder entry selected, you can add now a Sphere (Insert
> Finite Solid Primitives > Sphere
or
![]() Icon) after having selected the Cylinder entry: the Sphere appears
immediately after the Cylinder in the Object tree. In the Object
Properties View for the Sphere, adjust the following parameters:
Icon) after having selected the Cylinder entry: the Sphere appears
immediately after the Cylinder in the Object tree. In the Object
Properties View for the Sphere, adjust the following parameters:
![]() Center
Center
x = -8, y = 0, z = 0
Again, the Hollow box should be
unchecked. With the Sphere selected in the Object tree, we will
insert a Torus, because it is a Finite Solid Primitive we never used
to this day (Insert > Finite Solid
Primitives > Torus or
![]() Icon) and that will add some fun to the process.
Icon) and that will add some fun to the process.
![]() Torus
Torus
Minor radius: 0.25
Major radius: 0.6
![]() rotate
rotate
x = 0, y = 0, z = 90
![]() translate
translate
x = -2.5, y = 0, z = 0
Finally,
with the Torus selected, we can insert a Box object (Insert
> Finite Solid Primitives > Box or
![]() Icon) and adjust its parameters as follow (uncheck the Hollow box):
Icon) and adjust its parameters as follow (uncheck the Hollow box):
![]() Upper Box
Upper Box
Corner 1: x = -9, y = 0.4, z = -1
Corner 2: x = -1.5, y = 0.6, z = 1
Duplicate it three times the same we did in Step 2. Rename respectively the boxes Upper Box, Lower Box, Left Box and Right Box and change the Object Properties as follow:
![]() Lower Box
Lower Box
Corner 1: x = -9, y = -0.4, z = -1
Corner 2: x = -1.5, y = -0.6, z = 1
![]() Left Box
Left Box
Corner 1: x = -9, y = -1, z = 0.4
Corner 2: x = -1.5, y = 1, z = 0.6
![]() Right Box
Right Box
Corner 1: x = -9, y = -1, z = -0.4
Corner 2: x = -1.5, y = 1, z = -0.6
That's it! All the primitives are set, let the magic of the CSG operates!
Step 6: Using CSG for the Shaft
With the
Scene entry selected, please insert a Merge and a Difference object
(Insert > Constructive Solid
Geometry > Difference and Merge or
![]() and
and
![]() Icons) as Last Child. You should have something like this in your
Object tree:
Icons) as Last Child. You should have something like this in your
Object tree:

As we already did in Step 3, using Drag&Drop, CTRL+X (Cut) and CTRL+V (Paste) or the Cut and Paste icons, sort the entries of the Object tree in order to get the following result (choose First Child or Last Child as appropriate):

Please note that the Blade and the Shaft of the screwdriver have been both moved in the Union entry we inserted during Step 3. You can rename the difference entry 'Screwdriver Shaft' and the union entry 'Screwdriver'. All the modelings are now over, but we still have to set a proper texture for the Shaft.
Step 7: Setting a material for the Shaft
Select the Scene entry in the Object
tree, then insert a Declaration as a Last Child (Insert
> Declaration or
![]() Icon).
Icon).
In the Object Properties View, you can
rename it to Chrome. Then Insert a Texture (Insert
> Textures > Texture or
![]() Icon), a Pigment (Insert >
Textures > Pigment or
Icon), a Pigment (Insert >
Textures > Pigment or
![]() Icon) and a Solid Color (Insert >
Textures > Solid Color or
Icon) and a Solid Color (Insert >
Textures > Solid Color or
![]() Icon). Click on the Solid Color entry and modify the parameters as
follow:
Icon). Click on the Solid Color entry and modify the parameters as
follow:
![]() solid color
solid color
red = 0.98039, y = 0.94902 , z = 0.05490
filter = 0.45, transmit = 0.2
Now select the Texture entry, Insert a
Finish (Insert > Textures >
Finish or
![]() Icon) and adjust the parameters as follow:
Icon) and adjust the parameters as follow:

The texture has been correctly set, but you still have to assign it to the Screwdriver Shaft. In order to do this, first move the Texture Declaration just after the Chrome declaration previously set in the Object tree.

Select the Screwdriver Shaft, and
insert a texture (Insert >
Textures > Texture or
![]() Icon) as Last Child. Click on the Select button and then choose
'Plastic' in the popup list.
Icon) as Last Child. Click on the Select button and then choose
'Plastic' in the popup list.

And here's the final result:

Conclusion
Here we are, at last. Our brand new
screwdriver is almost ready to use in another scene. To make things
easy, you would like to select the Screwdriver entry, and insert
transformations properties (Insert >
Transformations > Scale, Rotate and/or Translate,
or
![]() ,
,
![]() and
and
![]() Icons). Importing this object in another scene is quite easy and
straightforward: you need to have the source file and the destination
file both open in kpovmodeler. In the source file (screwdriver.kpm,
for instance), select the Screwdriver, Chrome and Plastic entries.
You can then copy and paste them in the destination file
(yourscene.kpm, for example). In fact, you can copy and paste any
object of the Object tree from a source file to another. This means
that you can easily import textures, lighting conditions, camera and
so on. Have a good time!
Icons). Importing this object in another scene is quite easy and
straightforward: you need to have the source file and the destination
file both open in kpovmodeler. In the source file (screwdriver.kpm,
for instance), select the Screwdriver, Chrome and Plastic entries.
You can then copy and paste them in the destination file
(yourscene.kpm, for example). In fact, you can copy and paste any
object of the Object tree from a source file to another. This means
that you can easily import textures, lighting conditions, camera and
so on. Have a good time!